The default keyboard for Huawei Ascend comes with a multitouch, but what if you want to change and install a new keyboard. This is a thing unique to Android platforms because there are numerous keyboard options.
First, you need to install some new keyboards.
There are many different options when it comes to Android keyboards. Play around with all of them and see which one fits you best. Better Keyboard It will allow you to change and fine-tune the keyboard to make it your own. SwiftKey is another option that provides impressive word prediction, including a feature that predicts the next word you havent even begun to type yet.
Its now ready to switch a new keyboard: 1. Tap the applications launcher
2. Scroll over and tap Settings
3. In the settings menu, scroll down and tap Language & keyboard
Alternate Text If you have a custom keyboardinstalled, you will see an option to toggle it on and off with a check box. In order to have it appear as a selection, the box next to your myTouchd keyboard must be checked.
4. Tap on Input method
5. Find the name of the keyboard you want to activate, and tap on it.
Alternate Text
6. Press the Home button If you want to test it to make sure it is activated, just press the Search key, and your keyboard will pop up like in the image above.
Many users have been looking answers on how to disable some applications on their HTC Sensation that dont suites their likings. Since advance users knows it that it is impossible to remove, delete, uninstall and disable those system bloatwares without rooting the phone. We found some guide over XDA-developer by way of temporarily rooting HTC Sensation will get access to somewhat disable the said system default applications or bloatwares.
Note: this guide is for advance users only that may know some tweaks about Android devices. You may find the instructionhere on this thread over XDA-developer.
How To Upgrade OS Android Samsung Galaxy Fit from Froyo to Gingerbread?
Since you do not understand everything about how to upgrade the OS to Android, the post I will discuss on How to Upgrade OS Android Samsung Galaxy Fit from Froyo to Gingerbread?
What is OS? OS is an Operating System that is used on a device, such as Android we are discussing today. In addition to Android there are also Windows, Linux, etc. that I can not mention one by one. Well, but is it possible for us to upgrade it? Whats own upgrade? Upgrade is a step in which we will enhance the ability of the OS we are using today to a newer operating sysytem, in this case I upgrade from OS Froyo to Gingerbread for Samsung Galaxy Fit S5670.
Steps Upgrade OS Android Samsung Galaxy Fit from Froyo to Gingerbread: 1. Prepare in advance the tools we need. As ODIN Multidownloader, File .ops, and firmware that we use. 2. If you do not already have it, please download ODIN Multidownloader and file .Ops for Samsung Galaxy Fit here (for file .opsnya different for each devices). For the firmware you can find yourself well. Here I only explain a few steps alone. 3. After you download all the equipment, first open your Multidownloader ODIN. Then insert the file .Ops in place, and check One Package (if you use the One Package, if not leave it alone). 4. Then Enter the firmware into place, (File firmware berkestensi. Tar, if still in the first extract rar please.) 5. Then once everything is ready, plug the phone. Download your favorite Android in by pressing the Mode Down, Home, Power simultaneously. After appearing in yellow on the upper left Multidownloader ODIN and it was a sign already detect it, please click on START 6. Never unplug the cable from your computer, because it would thwart the upgrade process and the risks that occur on their own responsibility. 7. Wait until the process is complete. Highlighted in yellow on the upper left ODIN became blue. Completed.
Most smart phone and smart android phones already have this feature built in to the phone. wi-Fi hotspot simple meaning wireless access point, Wi-Fi hotspot is sharing internet between wi-fi devices.
You have wi-fi hotspot device you can share internet connection to your friends smart phones, and other wi-fi enabled devices. Ex.smart phones, laptop, etc..,.
I am going to explain how to Active Wi-fi hotspot and how to share internet connection on your samsung galaxy y android phones.
You can follow these simple steps
Go to menu > settings > Wireless and networks.
Select Tethering and portable hotspot.
Select portable Wi-Fi hotspot settings.
Select Configure portable Wi-Fi hotspot settings.
Type Your Hotspot Network SSID Name.
Select Security type open > save
Select (Tic) portable Wi-Fi hotspot.
Now you can share internet other WI-Fi enable devices. Enjoy.
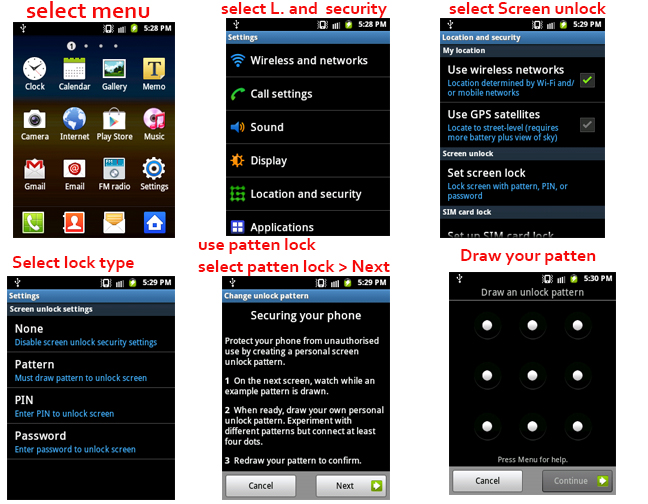
Dont like your kids to use with your mobile or someone to read your emails, SMS, pictures videos on your Android Dives? Don’t worry, now you can lock it with a password, pin, and pattern Unlock. You can follow the easy steps below to configure your android dives. This the step you can follow
Go to Menu > Select “Settings” > select “Location and security”
Select “Screen lock”
Choose you want lock type (None, pattern, pin, password)
Want to access your phone use your security type to access your phone.
Have you ever been in a situation where you mistakenly (or not) wiped the content of the internal storage (including system partition and virtual SD card) on your phone or tablet and unfortunately it doesnt support external storage? Now you cant flash desired custom ROM because you removed it and the device cant be booted due to wiped system partition. Dont worry - its very easy to fix!
Here are the steps you need to follow to copy the correct rom.zip package to your internal storage:
Download this mini-sdk package and extract it to c:mini-sdk
Rename the custom ROM package you want to flash to "rom.zip" and copy it to c:mini-sdk
Connect your device to the PC
Boot your device in recovery mode
Open a command prompt on the PC (cmd.exe), type and confirm each command with ENTER:
cd /d c:mini-sdk
adb shell
mount /data (error might mean that /data partition is already mounted)
on Android 4.2 and above: mkdir -p /data/media/0
on Android 4.1.2 and below: mkdir -p /data/media
exit
on Android 4.2 and above: adb push rom.zip /data/media/0
on Android 4.1.2 and below: adb push rom.zip /data/media
Wait for a few minutes until the file is copied. It will looks like command shell is not responding, but that means its still copying. Wait patiently until youll see blinking cursor again.
Depends on your custom recovery, use the navigation keys to flash the custom rom.zip package in a typical way you used to flash custom ROMs. It should be on your internal storage now. Done!
Have any questions or comments? Feel free to share! Also, if you like this article, please use media sharing buttons (Twitter, G+, Facebook) below this post!
Once in a while, a software bug in the kernel will cause a random reboot, so in order to help kernel developers to fix and troubleshoot the reboots, a kernel log need to be submitted to the developer for further analysis and hopefully lead to a bug fix.
Most Android kernels have "RAM Consoles" to save the necessary kernel logs immediately after reboot in the RAM. The users can then retrieve this RAM log on a subsequent reboot to submit to kernel developers. Here is a quick tour on how to do that.
[ Using ADB ]
adb shell
su
cat /proc/last_kmsg > /sdcard/last_kmsg.txt
exit
exit
adb pull /sdcard/last_kmsg.txt
File last_kmsg.txt will be located in the same location as adb.exe executable.
[ Using android terminal app ]
su
cat /proc/last_kmsg > /sdcard/last_kmsg.txt
exit
exit
adb pull /sdcard/last_kmsg.txt
File last_kmsg.txt will be located on your SD-card.
[ Using Root Explorer / ES Explorer with Root ]
go to /proc folder
copy last_kmsg to /sdcard/
rename last_kmsg to last_kmsg.txt
File last_kmsg.txt will be located on your SD-card.
The best method to share the last_kmsg.txt content is to upload it to pastebin.com and send a link to the developer.
Source: faux123 (Google +)
Have any questions or comments? Feel free to share! Also, if you like this article, please use media sharing buttons (Twitter, G+, Facebook) below this post!
If you are a new user of Samsung Galaxy S II I9100 and you wanted to upgrade your phones firmware to any latest updates, all you need is a personal computer or laptop and install a software program called KIES, you can download it via Samsung official support. You cant do it over the air or OTA like any other android smartphones by using software update option, Yes you can see a software update option in phone under settings and you need to specify your samsung account details as well.. but as of now its doesnt work on Samsung Galaxy S II I9100.
Aside from Kies update you can also manually upgrade the device by a way of using ODIN downloader tool and an original firmware.
This method is not recommended for beginners since it will cause some problems and sometimes mess up the phone, called bricking.
If you want to learn by this method you may visit XDA-developer, many advance users in there shares a useful tweaks and tips about Samsung Galaxy S II I900 firmware.
Do you want to reset your galaxy phone default factory settings.
How to reset.....?????? Go...select... press......press and hold.....type this .......etc....ok
Dont worry. It is simple. I explain how to it works. Hard reset you phone delete, lose your personal data. First of all charge your phone batter and backup your important, personal data. Take out your SIM card and SD card.
To reset your phone dial this code *2767*3855#
Wait until finishing reset and automatically reboot phone. Do not press any buttons, do not touch any place will reset and reboot. Now your phone is reset default factory settings. This code is work most samsung phones reset.
I dont buy into the iPad as a laptop replacement—not quite. But it is fantastic at tapping into your computers to access video and audio, documents, and even your full desktop, remotely. Heres how.
The iPad is first a foremost a device for consuming media, and where is most of your media if not on your desktop or laptop? All your videos, both self-created and downloaded; your music collection, which is so much larger than your iPads flash storage can dream of accomodating; your store of documents, which contain so much information about you, your work and your interests. On your iPad, this stuff is too often there, not here—but it doesnt have to be.
You can easily access all of these things from your iPad with a set of simple-to-use apps, and where those dont work, you can actually control your computer—mouse and all—from your iPad. Heres what you need:
Audio and Video
Audio and video streaming on the iPad is, for the time being, the domain of two apps: Air Video and StreamToMe. Theyre extremely similar, sharing their $3 price, iPhone compatibility, and an underlying video conversion library, but a few key differences will determine which one you need to download. So!
If you...
• Have a Windows PC • Dont need to stream audio • Tend to store your content in h.264/mp4 files
Go with Air Video. Its a wonderful app, which lets you stream video—even in formats not natively supported by the iPad—both locally and remotely (with simple port forwarding), and which has both Mac and PC server software. Its flexible as well, giving you precise control over streamed video quality, and options for either transcoding video live, or pre-converting it before streaming.
SEXPAND
h.264 playback, even in HD, seemed cleaner and bit smoother than in StreamToMe, so if youve ripped or downloaded most of your content in that format, Air Video is a slightly better choice. It transcodes your downloaded .avi file beautifully, too.
(Note there currently isnt a good DLNA streaming app, though once its bugs are worked out, PlugPlayer shows promise. For the time being, Air Video is the only way to stream and transcode your video library stored on a Windows PC)
If you...
• Have a Mac • Want to stream audio files as well
Then you should download StreamToMe. It too can transcode video in real time, so you dont need to worry about converting your home video files or P2P downloads. Its main advantage over Air Video is that it can stream audio. Itd be nice if the app had an iTunes-style artist view, but if your iTunes music folder is organized by artist name and album title (if you havent told it to do something else, iTunes will have taken care of this for you), navigating through and playing songs is pretty straightforward.
SEXPAND
The setup routines for both apps are nearly identical. Each requires a server app to be run on your computer, which needs to be pointed to your video library, and each will automatically recognize your computer over a local network. For remote streaming, each app provides guidance for which ports to forward on your router. (For instructions for your specific router, check here.) This means you can stream your home video from anywhere—work, a hotel room, whatever—over Wi-Fi.
Documents
Document sharing on the iPad isnt particularly easy, relying on the awkward iTunes file sharing system, which only lets you access documents in the app theyve been flagged for. To browse apps in a more useful way, youll need get an app called GoodReader. Its $1.
SEXPAND
GoodReader is an app that enables you to connect to all kinds of file servers, be they cloud-based (Google Docs, Dropbox, or MobileMe) or local (an FTP or WebDAV server). Once connected, GoodReader lists files that can be read on a given server, which are left up to the iPads inbuilt viewers to display. This means that Word, Excel and PowerPoint documents, as well as a range of other text files, images, and even audio files, can be opened in the app.
SEXPAND
One of the most compelling features of GoodReader is that it can turn your iPad into a local file server, which you can mount and connect to from any Mac or PC. This feature lets you drag and drop your documents to the iPad, as if it were a NAS device. (GoodReader also shows up in the iTunes USB file transfer dialog, but Wi-Fi drag-and-drop transfer is much faster and easier, once its set up.) Instructions for server setup are available here.
Additionally, using the apps "Manage Files" pane, you can sort, administer and email your documents as well. Its basically like having a disk for all kinds of media, on your iPad, along with a file browser. Ha!
Controlling Your Desktop
If you want full access to your computer, video, audio and document file servers wont be enough. What about your applications? Your iPad-incompatible files? Your entire desktop? To get that kind of control, you need to use VNC.
From our previous How To guide on the subject:
VNC (virtual network computing) is one of those tricks that never gets old, and having it set up can often save your ass-whether you left some info on your home computer that you need at work, want to check on your massive BitTorrent queue to schedule the evenings entertainments, or help your poor parents use clip art in Microsoft Word, having remote access can be handy dandy.
For full setup instructions for Windows and OS X, follow our guide here.
Once youve done that, youll need an iPad VNC client. The iPad App Store already has a handful of VNC apps available for download. The ones Id go with are Mocha VNC Lite (a free, limited-capability app), and if you find you like the VNC concept, the $12 Desktop Connect.
SEXPAND
Its strange, controlling a mouse-based computer from a touchscreen device, but theres one option Ive found makes life a lot easier: In Desktop Connect, turn Touchscreen Mode off. This options has you control the mouse as if the whole touchscreen is a trackpad, rather than having to guide the mouse directly with your finger. After a few minutes, youll be clicking around Windows or OS X without thinking about it.
Want to install Mac OS X Mavericks Hackintosh on your PC? Thanks to the latest UniBeast release which adds support for Mavericks, you can now have best of both worlds (Windows and Mac) on your Intel-based PC.
The following guide will help you install OS X Mavericks v10.9 on your PC.
Requirements:
Access to Mac for downloading OS X Mavericks from MAS and creating UniBeast drive.
8GB+ USB flash drive.
An Intel based PC capable of running Mavericks.
Guide on how to install OS X Mavericks Hackintosh on your PC:
Step 1: On your Mac, download OS X Mavericks for free from the Mac App Store. Make sure the downloaded installation file is in /Applications folder.
Step 2: Download the latest version of UniBeast and MultiBeast from here.
Step 3: Format your USB flash drive using Disk Utility on Mac with the following settings:
Start Disk Utility on Mac. Select your USB drive from the left hand column.
Select the Partition tab from the right side. Click on Current dropdown menu and choose1 Partition.
Now click on Options… button, select Master Boot Record.
Type ‘USB’ as the Name for the drive. Select Mac OS Extended (Journaled) as Formattype.
Once done, click on Apply followed by Partition.
Step 4: Now start UniBeast that you downloaded in Step 2 above.
Step 5: Skip through the first few screens by clicking Continue or Agree, until you get toDestination Select screen.
Step 6: Select your USB drive and click Continue to proceed.
Step 7: On Installation Type screen, make sure Mac App Store Mavericks – 10.9 is selected in packages. Additionally, select Legacy USB Support if you are using an old system with Socket 1156. Select Laptop Support package if you are installing it on a notebook PC. Once done, clickContinue, enter admin password for your Mac if prompted, and let UniBeast make a bootable Mavericks hackintosh USB flash drive for your PC.
Once done, move MultiBeast file that you downloaded in Step 2 above to this bootable Mavericks hackintosh USB drive (you will need this later).
Step 8: Now insert this bootable Mavericks hackintosh drive in your PC. Make sure the BIOS is set to boot the system from USB devices. When you boot from the USB drive, you will see Chimera boot screen, select “USB” and hit Enter on keyboard to continue.
Step 9: Once you are into OS X installer, you need to format the HDD you want to install Mavericks to using Disk Utility with the following settings:
On the menu bar, click on Utilities, then start Disk Utility.
Select the HDD you want to install OS X to from left hand side.
From right side, click on Partition tab, then click on Current dropdown menu and choose 1 Partition.
Now click on Options… button, choose GUID Partition Method.
Type ‘Macintosh HD’ as the Name for HDD. Select Mac OS Extended (Journaled) asFormat type.
Click on Apply followed by Partition to partition the drive.
Step 10: Once done, close the Disk Utility program, go back to the installer. Select “Macintosh HD” as the drive you want to install OS X to.
Click on Install for the installation to begin.
You’re almost there! Once the OS X installation is complete, you need to make this HDD bootable. This can be done using MultiBeast utility. MultiBeast can not only make OS X HDD bootable, but can also install the required drivers for audio, WiFi, graphics, LAN and more.
Step 11: Reboot your system again using the bootable Mavericks hacktintosh flash drive. From the Chimera boot screen, select “Macintosh HD” this time.
Step 12: Start MultiBeast, from here, choose all the drivers required for your PC. Once done, click on Build followed by Install to complete the installation.
That’s it! You now have fully working OS X Mavericks installed on your PC.
Probably every Android power-user at least once in his life used ADB - Android Debug Bridge. It is a versatile command line tool that lets you communicate with an emulator instance or connected Android-powered device. Using ADB shell commands gives you additional control over your device and sometimes it can save your device from being bricked (example: How to: copy ROM zip file to the freshly wiped device). You can find some more basic information about ADB here.
Since Android Jelly Bean there has been a new ADB mode available in the AOSP recovery, incorporated by the Android developer community into custom recoveries too. It is called "ADB sideload" and most of you probably have heard about it already. This is an alternate method to the one I wrote about here - How to: copy ROM zip file to the freshly wiped device. The main difference is that ADB sideload works only with recoveries based on Jelly Bean source or newer. I believe that ADB sideload was created to simplify the process of flashing/restoring Android update.zip packages.
Keep in mind that while using ADB sideload, the regular ADB shell wont work. To be able to use SIDELOAD mode make sure youre running latest ADB drivers from the Android SDK (Platform-tools). Here are the simple steps you need to follow to flash update.zip package using adb sideload mode (based on stock Android recovery):
Place the ZIP package you want to install in the same location where you keep ADB drivers - adb.exe, AdbWinApi.dll and AdbWinUsbApi.dll (usually its SDKplatform-tools)
Make sure you have USB debugging enabled in Settings > Development on your device
Make sure your phone drivers are installed on the PC youre going to use
Boot your device in recovery mode (Android logo with a exclamation mark) and connect your device to PC
Hold down "power" button first, followed quickly by "volume up" button. You should now see the recovery menu
Use the volume up/down keys to select "apply update from ADB," then press power to select it
Open a command prompt on the PC (cmd.exe), type and confirm with ENTER:
cd /d <adb.exe location> (for example: cd /d c:SDKplatform-tools) or you can open your SDK/platform-tools folder, then press SHIFT button and the right-click mouse button and choose “Open command prompt here”
The zip package will begin installing. When its done, select "reboot system now."
How is that different from the alternative method? You dont have to manually create the proper folders structure, push the file and later install if from inside the recovery menu. The result is basically the same, because ADB sideload is also transferring the zip file into the device internal memory and later it automatically begins the installation procedure. However, it works only with recoveries based on Android Jelly Bean source.
Have any questions or comments? Feel free to share! Also, if you like this article, please use media sharing buttons (Twitter, G+, Facebook) below this post!
"Hi Friends, Please advise me How to connect my galaxy y phone internet to my PC using the Data cable."
This is my Friends E-mail. Most my friends ask me how to connect internet From android phone to PC or laptop. It is simple, You can follow below simple steps.
: Install SAMSUNG Kies Software Your PC or Laptop.
: Connect your android phone to PC or Laptop using Data cable.
: Go to your Android phone Menu > Settings > Wireless and Networks
: Select Mobile Networks > Tic Use packet data
: Select Tethering and portable hotspot > Tic USB tethering
Now you can see your status bar blue icon and HSDPA icon. Now your android phone connected to internet. You can internet your PC or Laptop. Browsing and enjoy.
Heres a simple tips on Samsung Galaxy Ace that help how to free up internal memory with just one click. All you need to have is a rooted Samsung Galaxy Ace and install and used this application called "Gemini App Manager" its Free and already proven works and tried myself.
This "Gemini App Manager"can move application such as facebook, twitter etc. This also move maps but my experience I say dont move Maps as its system application and needs to acess gps,wifi and many other system rescources so leave it on internal memory bcoz if u forecfully moved map, it will become unfuntional of no use, so leave it as it is
Features of this application: Show app information (including risk info, e.g. show which app can call outgoing, or can send out SMS, or can use Camera, or can find your location (GPS), etc), Autorun management (enable/disable conditions for autorun), Kill process (one key RAM optimize, kill all, or kill by selection), Move/batch move apps from phone to SD card(Android 2.2 or later), Move/batch move apps from SD card to phone(Android 2.2 or later), Uninstall/batch uninstall apps, View application details Clear app cache, View app on market, Sort apps by multi ways, Filter apps by multi ways,
Grab the application here: http://www.appbrain.com/app/gemini-app-manager/com.seasmind.android.gmappmgr